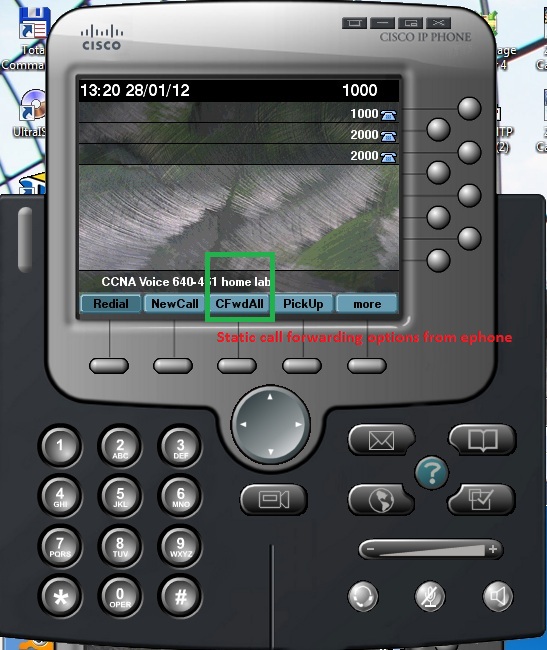
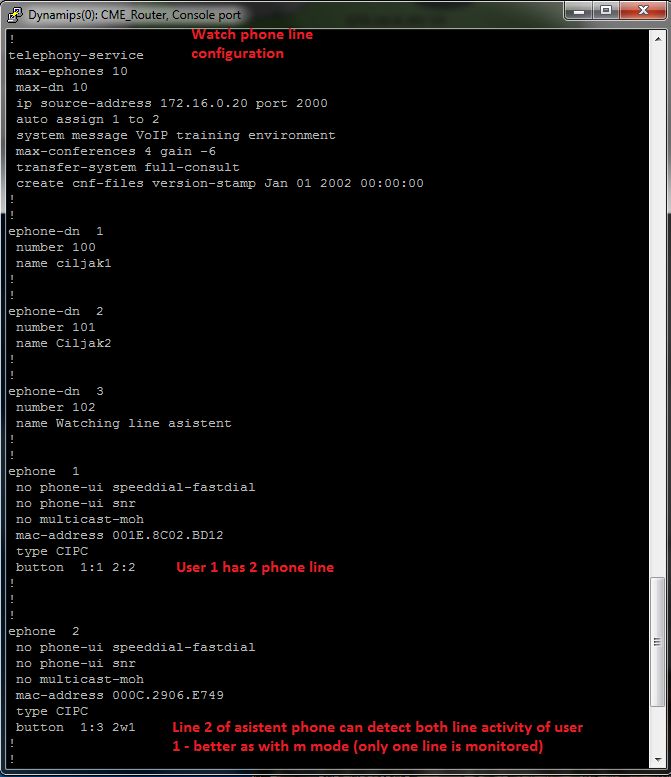
1

8. Call Pickup

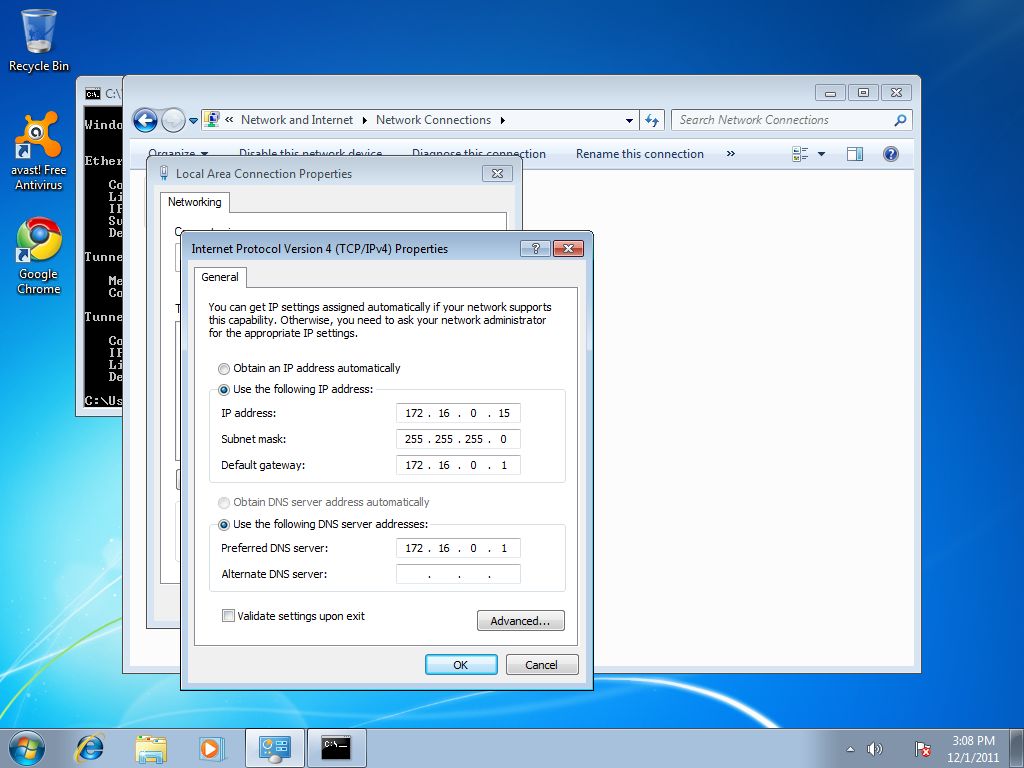
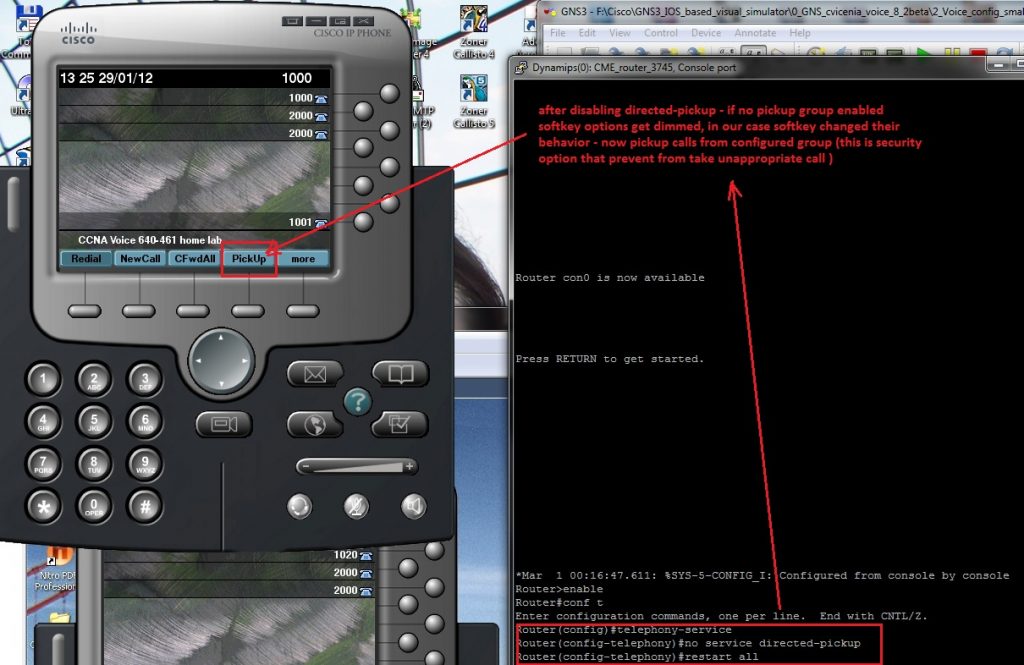
Enable to answer a remote extension on our local phone. Using PickUp key on ephone and enter extension of ringing phone you can answer phone. If this is undesirable  (any phone can pickup any ringing ephone in company) you must disable directed pickup feature (enabled by default). Entering command 

no service directed-pickup

within telephony-service mode.

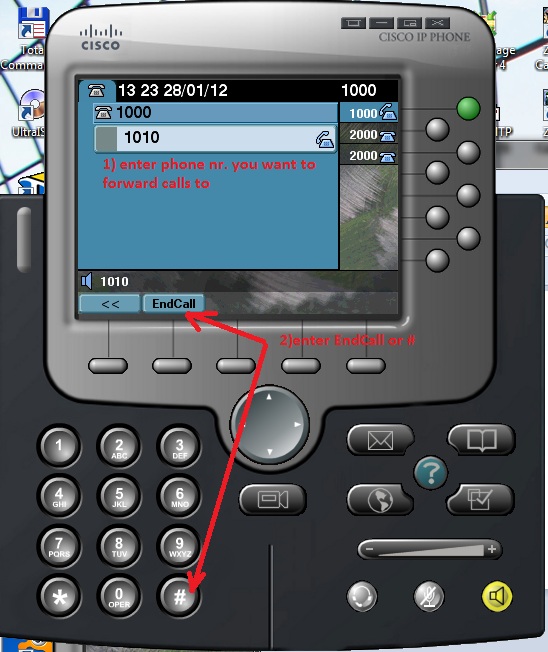
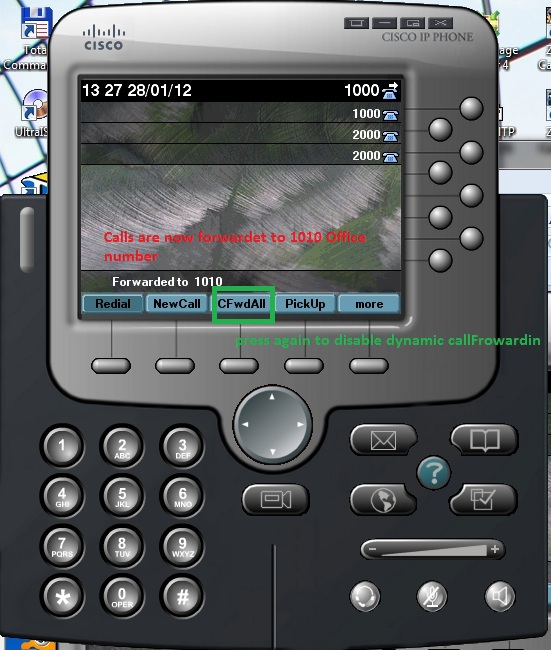
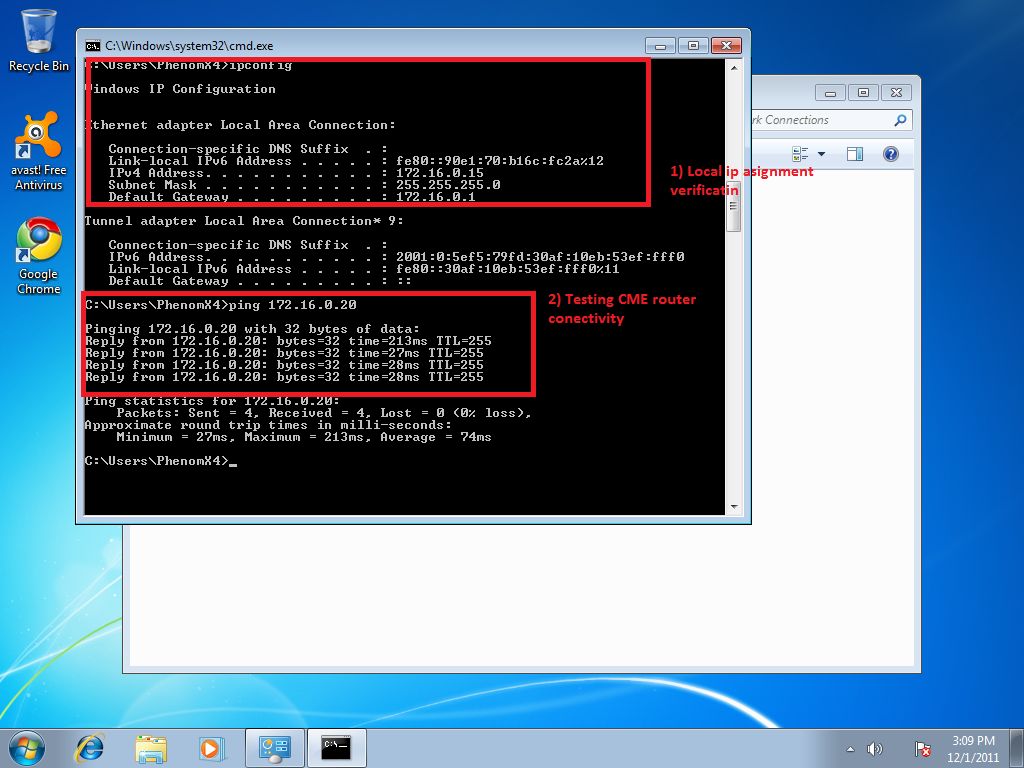
Next figure show how to use mentioned command.

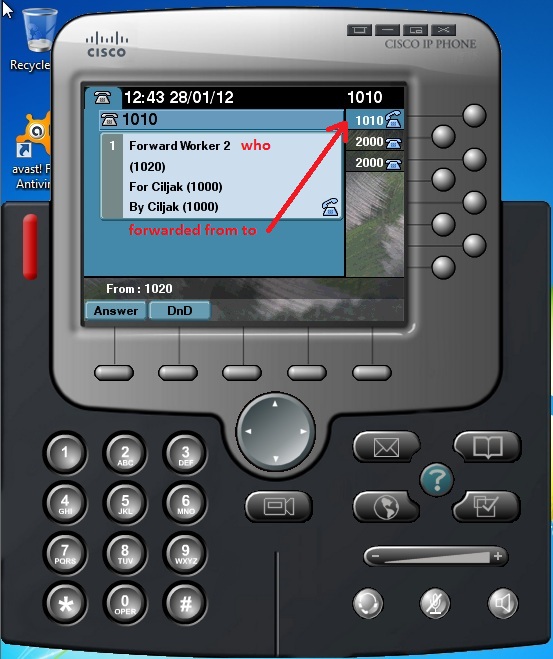
Much more control to pickup of ringing ephone introduce pickup groups. We can use pickup-group command in config ephone-DN. In our scenario it is

ephone-dn  1
 number 1000
 pickup-group 9000
 name Ciljak
!
!
ephone-dn  2
 number 1010
 pickup-group 9000
 name Worker 1
!
!
ephone-dn  3
 number 1020
 pickup-group 9001
 name Worker 2
!

Full config can be obtained from here (consist also from ephone-dn from previews labs). Ephone 1 and 2 share same pickup group 9000, ephone 3 with button associated with ephone-dn 3 belong to another pickup group 9001.

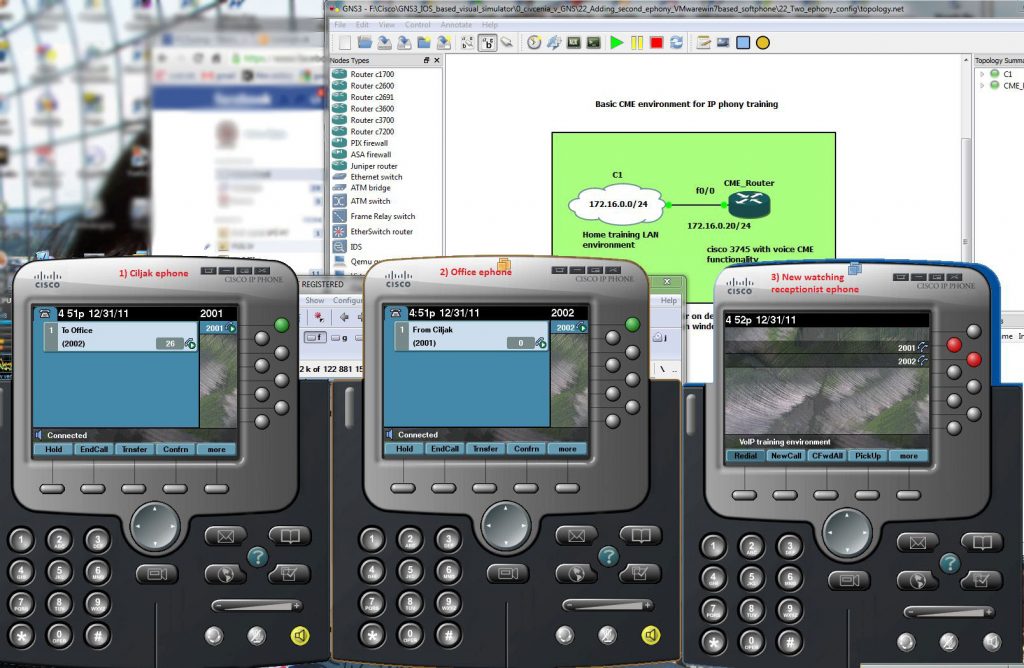
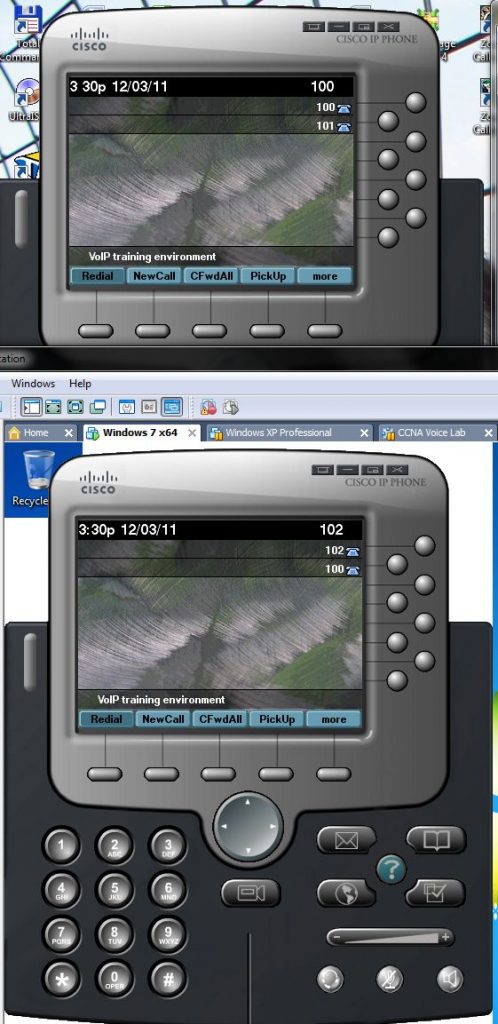
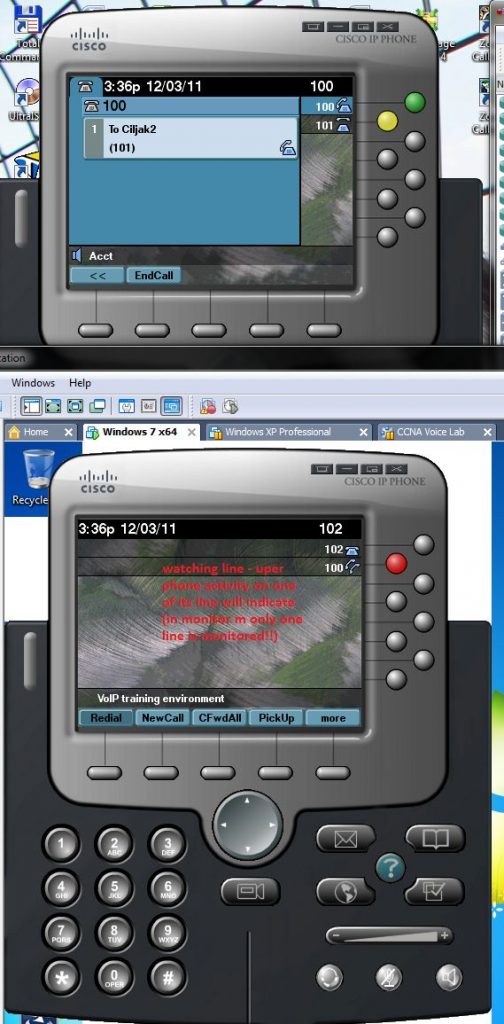
Closer look at configuration and pickup of call is on next pictures.

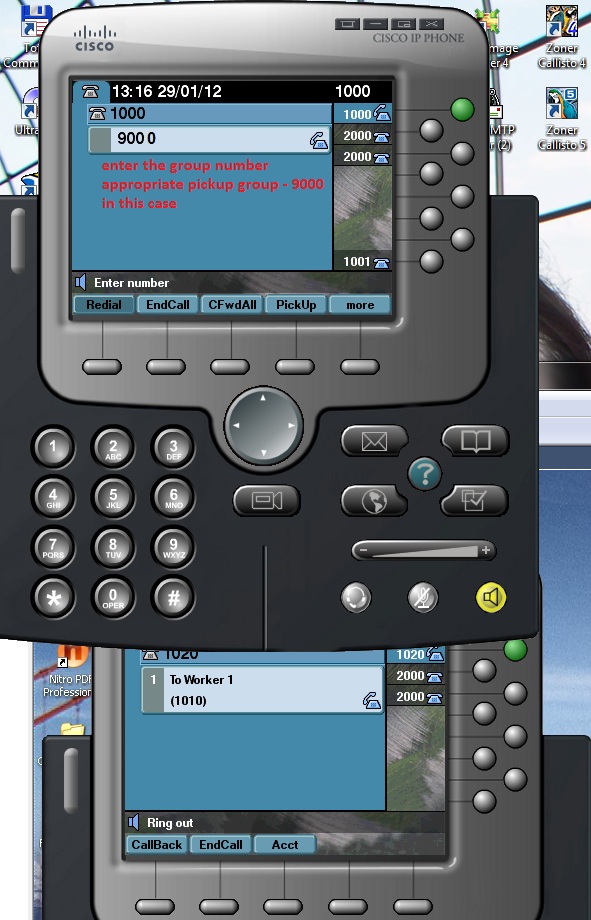
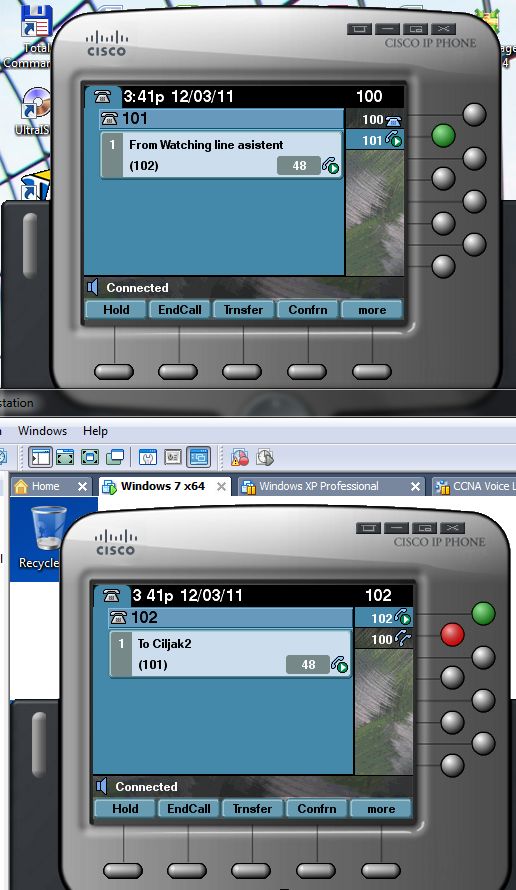
From phone 3 (1020) is placing call to ephone 2 (1010). This phone is on same pickup group 9000 as ephone 1 that will initiate pickup.

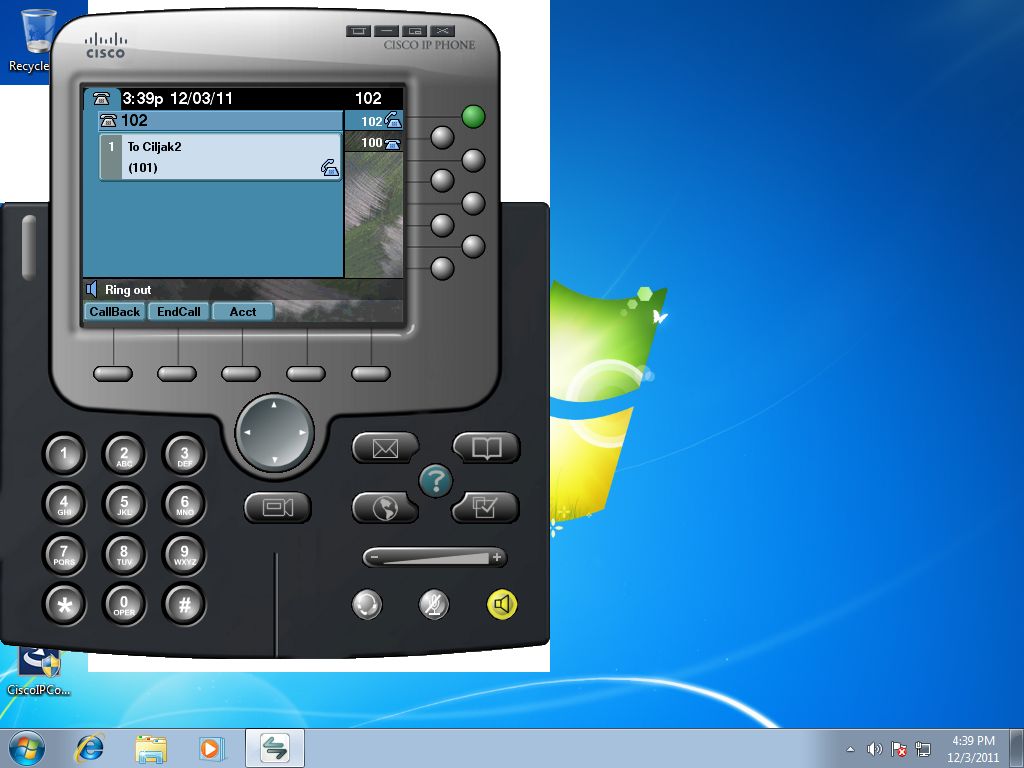
On ephone 1 is pressed softkey GPickUp (shy in more options on basic screen).

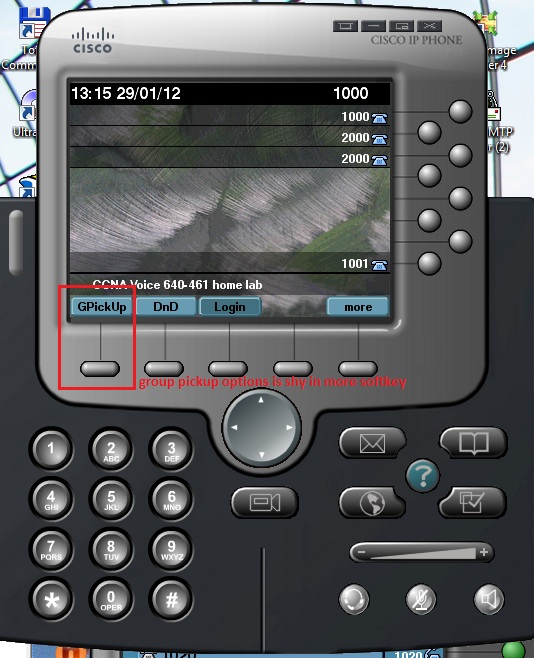
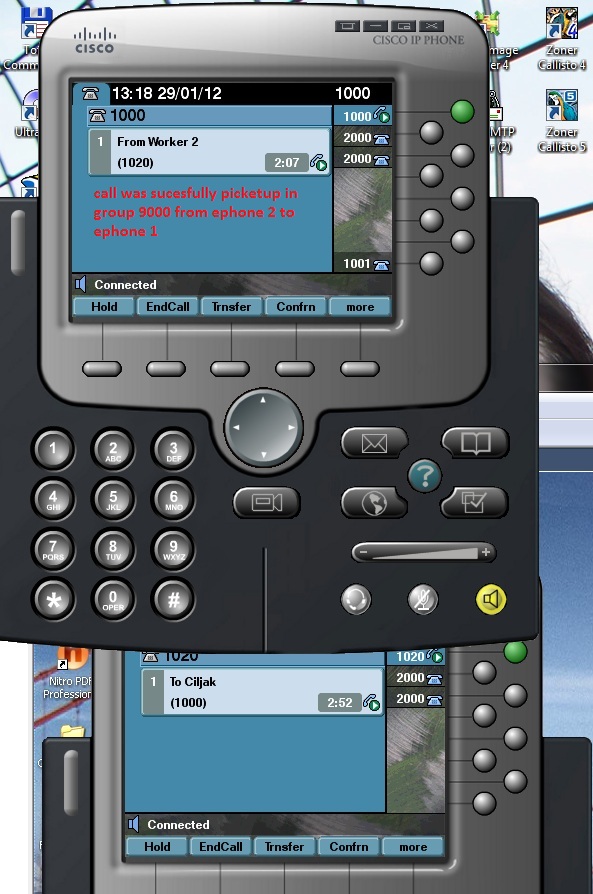
Pickup of call from another phone in same pickup group can begin with pickup group number entering. After call pickup is call answered from ephone 1 and not from desired destination of caller to ephone 2.


7. Call Transfer

Call transfer is process of moving an active phone call from one phone number to another. 

This process can be invoked by pressing Trnsfer softkey and dialing the number where we wish to forward call. 

Before we can transfer a call we must consider some aspects of call transfer.

1) There are 3 transfer options that can be configured under telephony-service at CME router

full-blind – transfer call immediately after entering a transfer number (available on single-line ephone-dn as only one options!!!)

full-consult – (default method but only if dual line available!!!) – allow you to speak to transfer nr. before call is forwarding. As it was mentioned earlier this setup requires dual-line ephone-DNs.

local-consult – (legacy options) –  similar to full-consult but voice traffic low is inefficient. Is cisco proprietary method and should be used only for backward compatibility with older phones.

Please remember that for single-line ephone-DNs the only options is full-blind because consult transfers require use of second line.

2) Transfer method can be configured also on individual ephone-DNs

This is way how we configure transfer options in this training lab. But when we will test consult transfer we must to configure ephone-dn 7 dual-line as extension as previews labs and assign them to eight button (example) on our octoline softephone IP communicator.

Full config from GNS cisco router 3745 vith CME capability can be obtained from here

After restarting (hard rebooting ephone 1) we can see this display on ephone screen

All we need we have at this time and transfer examination process can begin.

We initiate call from number 1020 to number 1001 that can look like this

Extension 1001 (my ephone answer the call and decide to transfer it to 1010). I press Trnsfer softkey and type 1010 as forwarding destination – there is dual-line important for consult mode. Transferring call is placed on hold (on picture upper subline of duall line) and transfer consult to 1010 begin (second subline in dual-line on picture).

User on transferring destination with extension 1010 lift the handset of ephone and consult. 

When consult is at its end i can press Trnsfer softkey for second time that definitive transfer call from my ephone with extension 1001 to 1010 extension. As you can see call is transferred from 1001 to 1010 and all communication is now only between 1020 (initiator of call) and 1010 (call was transferring from 1001 to new extension 1010).

Steady state after call transfer show next picture


6. Call Forwarding

Call forward is a voice productivity feature that can to direct all of your calls to different ephone.

There are 2 different types of call forward:

1) Dynamic call forwarding – forward calls on the cisco phone itself.

To forward call you can press CFwdAll softkey on ephone, enter the phone number you want forward a calls to and press End softkey or # button. This step by step process show next pictures.

You can see icon in upper-right corner to indicate that phone has been forwarded.

When  forwarded call is received by appropriate device on their screen show message: call to number 1000 Ciljak from 1020 was forward to Worker 2 (1010).

When we will stop phone to forwarding calls, press the CFwdALL softkey again.


2) Static call forwarding – configure forwarding within cisco IOS. These are more options that offer dynamic call forwarding method. There are these options that can be configured at ephone-DN.


all – forward all incoming call

busy – forward calls when phone is busy

night-service – forward calls when CME is in night-service active time mode

noan – forward calls after a specified amount of time when phone has not been answered


example of config:

CME(config)#ephone-dn 1

CME(config-ephone-dn)#call-forward noan 1010 timeot 30

CME(config-ephone-dn)#end

Closer look at noan and busy call forwarding show next pictures:


Now we look at no answering ephone 1 with extension 1000 that will be forwarding to 1010 after 30s timeout of no answering.


5. Hybrid phone system for helpdesk environment

This training environment will introduce network helpdesk office. 3 ephones are configured with unique numbers but also with overlay button and third button is used for overlay line extension (x button). Each ephone can in future answer a call incoming from PSTN (call of clients calling to helpdesk).

 
ephone-dn 1
number 1000
name Ciljak
 
 
ephone-dn 2
number 1010
name Worker 2
no huntstop
 
ephone-dn 3
number 1020
 
these number are individual
 
ephone-dn 4
number 2000
no huntstop  
priority 0
 
ephone-dn 5
number 2000
no huntstop
priority 1
 
ephone-dn 6
number 2000
no huntstop
priority 2
 
ephone-dn 4 to 6 introduce shared line feeling and overlay assignment enable equal response from all phones with ability answer call from other phones when any other is busy (in active call).
 
ephone 1
mac xxxx.xxxx.xxxx
button 1:1 2o4,5,6 3×2
 
 button 1 individual dn, button 2 is overlay (key system feeling), button 3 extend button 2 overlay line.
 
Configured ephones will look like this


4. Extended watch line scenario

New scenario will extend previews with new ephone. Now we have three ephones. Our lab consist of:

1 ) Ephone 1 – extension 2001 – name Ciljak – IP 172.16.0.10/24 on hosting pc

2 ) Ephone 2 – extension 2002 – Name Office – IP 172.16.0.15/24 hosted on win 7 virtual PC

3 ) Ephone 3 (new) – extension 2003 and two watch line monitoring activity on ephone 1 and 2 (can act as receptionist ephone) IP 172.16.0.16/24.

Our goal is ephone-dn assignment to phone buttons as it is on next picture

CME was configured with these commands:

ephone-dn  1
 number 2001
 name Ciljak
!
!
ephone-dn  2
 number 2002
 name Office
!
!
ephone-dn  3
 number 2003
!
!
ephone  1
 mac-address 001E.8C02.BD12
 type CIPC
 button  1:1
!
!
!
ephone  2
 mac-address 000C.2906.E749
 button  1:2
!
!
!
ephone  3
 mac-address 000C.296C.D695
 type CIPC
 button  1:3 2w1 3w2
 
Commands introducing new ephone in this testing lab are marked with green color.
 
Watching ephone 3 detect activity on ephone 1

also as activity on ephone 2 (office) on their third line

VMware workstation offer for us unity view of application running in hosted environment. This options you can enable activating tool button marked next

When we „set free“ GUI of IP communicators then our lab will be much interesting


3. Monitor and watch line button separator

Monitor (m) separator allows receptionist or assistant phone to monitor your ephone-dn and examine your currently calls. Receptionist can optionally take care about your call and take message for you.

Example of config is:

cme(config)#ephone-dn 1

cme(config-ephone-dn)#number 2001

cme(config-ephone-dn)#ephone-dn 2

cme(config-ephone-dn)#number 2002

cme(config-ephone-dn)#exit

cme(config)#ephone 1

cme(config-ephone)#button 1:1

cme(config-ephone)#ephone 2

cme(config-ephone)#button 1:2 2m1       – line 2 on receptionist ephone monitor activity of ephone-dn 1

cme(config-ephone)# end


Possible problem will arise when there is 2 or more ephone-dn configured on monitored ephone. Then you need configure multiple monitor button on monitoring receptionist ephone.

Possible and preferred solution is configure watch phone (w) button options that does same thing with exception that it monitors all the ephone-dn instead of just one (m – mode).

Implementation of watch line feature for phone line in our testing environment:

1) Configuration commands


2) Look at prepared ephones in idle state

3) Watch line activity during call on upper ephone (watch line is second line on bottom ephone that monitor upper ephone line active – call to 101 or 100 number)

Call to 101 Ciljak 2 ephone-dn on upper ephone


2. Ephone button options

Button ephone-config commands are used to assign ephone-DNs to specific ephone.Button separator are used between line number (appropriate telephony line) and ephony-DN.

Example of config ephone 1 for normal beep:

router(config) # ephone-dn 1

router(config-ephone-dn) #number 2001

router(config) # ephone 1

router(config-ephone) # button 1:1

router(config-ephone) #end

Lets look at configurable button separators:

: – normal phone line

s – silent ring, ringer muted, call waiting beep muted

b – silent ring, ringer muted, call waiting beep not muted

f – feature ring

m – monitor line, silent ring, call waiting display suppressed

w – watch line, watch the phone off-hook via the phones primary ephone-dn

o – overlay lines, combine multiple lines per physical button

c – overlay call-waiting, combine multiple lines per physical button

x – expansion/ overflow, define additional expansion lines that are used when the primary line for an overlay button is occupied by an active call

For each button can be used different separator

       button 1f2 2s3 3o5,5 …

Our next article will focus on watch line configuration, that will expand m – monitor mode (only one monitored line, but not all ephone-dn in use). This feature is used on receptionist phones to see if an employee is using the ephone.


1. Basic VoIP lab with two ephone for upcoming experiments

At first we must add second ephone (cheaper training solution is second cisco IP communicator) on VMware hosted client. As obvious install os on virtual PC. Next you need to configure network bridging with hosting pc. In our scenario hosting (physical PC) belong to network 172.16.0.0/24 with default gateway 172.16.0.1/24 and CME gateway was configured with 172.16.0.20/24, first ephone is on hosting pc with IP 172.16.0.10/24.

Setup process for bridging hosted pc to hosting network adapter is described in next pictures:

1) Open Virtual Network settings dialog and set bridged (not NAT)

2) If you have more than one installed network adapter (WiFi, second network card, or virtual card of VMware) you must manually select appropriate bridging adapter as hosting client physical adapter (better is if you check it)

3) Configure IP address in hosted PC (in our scenario we used 172.16.0.15/24 and 172.16.0.1 as default gateway) -address assignment must be derived from your home network config – CME router and ephones are in this simple scenario in same subnet.

4) Verification of local stack and connectivity with CME router 172.16.0.20/24 from hosted PC (installed in VMware)

When we successfully configured network adapter bridging for hosted PC, next step is install and setup of cisco IP communicator:

When all is done, our testing home lab will look like this:

Ephone at top is installed in hosting PC with 172.16.0.10/24 IP, bottom ephone installed in hosted (virtualized) PC with 172.16.0.15/24 IP and GNS emulated cisco IOS with telephony service has its fa0/0 interface configured with ip 172.16.0.20/24 and acting as CME router (voice gateway).

Our first tested config (it will be explained in next articles) is


ephone-dn  1
 number 555
 name Ciljak
!
!
ephone-dn  2
 number 556
 name Office
!
ephone-dn  3
 number 500
!
ephone  1
 mac-address 001E.8C02.BD12
 type CIPC
 button  1:1,2f3
!
!
!
ephone  2
 mac-address 000C.2906.E749
 button  1:2
— some output was omitted
 

Now lets go for call placement from Office (bottom) ephone to Ciljak (me) top ephone:

Closer look at phones during call processing is:

For obtaining info about ephones and ephone-dn to buttons (lines) of physical ephone use #show ephone CLI command: